Manufacturing Execution System (MES) in Dynamics 365
Functional Vision
We’re back with a functionality that we have had available in our D365FO environments for some time. It is the integration of our environment with a third-party manufacturing system through the exchange of messages via API.
In the following image we can see the objective of this functionality. Just as D365FO will carry out inventory control and its own ERP functionality, the external system will provide Dynamics data on the state of manufacturing.
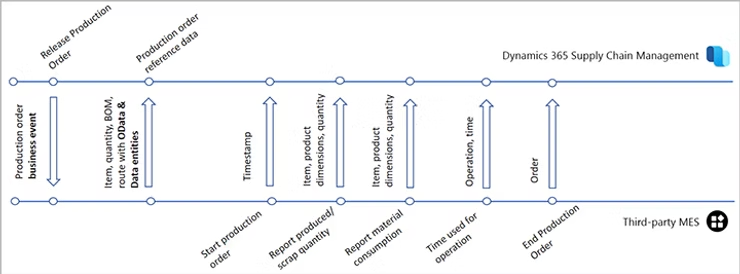
This third-party system can be either a complex plant control application or a simple presence sensor that reads the passage of elements through a production line. All we need is for these impulses/events to be translated into messages so we can send them to D365FO’s API.
The different events and messages exchanged between both platforms can be the following:
| Process Name | Description |
|---|---|
| Production Order State Changes | D365FO indicates to MES the state changes of productions |
| Production Order Start | MES indicates to D365FO which production orders to start |
| Reported as Completed | MES indicates to D365FO what quantities have been produced |
| Consumption | MES indicates to D365FO what products have been consumed |
| Time Consumed | MES indicates to D365FO the operating times |
| End Production Order | MES indicates to D365FO the completion of a production order |
The detail of each one of them as well as the fields we can provide to the API can be found in the official documentation of the feature:
https://docs.microsoft.com/es-es/dynamics365/supply-chain/production-control/mes-integration
This exchange of information occurs in real time and D365FO processes the received messages through a configured batch process.
We can check the received messages in the following route:
Production Control / Setup / Manufacturing Execution / Manufacturing Execution Systems Integration
In the following image we can see the structure of the control:
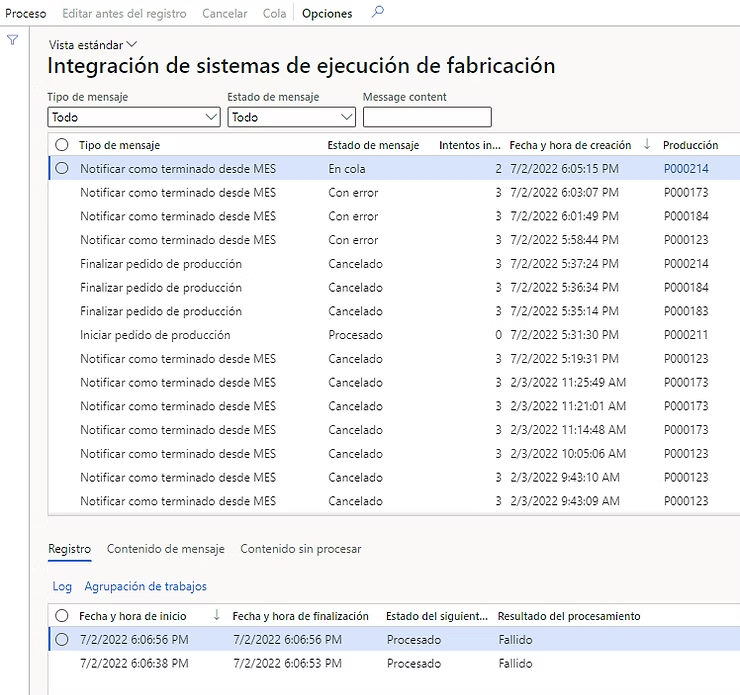
As we can see, the messages (grid above) are ordered by order of arrival and are referenced to the production order that we have entered in the message.
In the “Message Type” column, it indicates what type of process described in the table above will occur.
In the “Message Status” column we see in what situation that message is:
- Queued: the message is pending processing for up to 3 attempts
- Error: after 3 attempts the message is marked as error and all messages for that production remain “Queued” until this case is resolved
- Canceled: the message has been canceled by the user through the Cancel button. Only messages in the “Error” status can be canceled. Once canceled, they are not taken into account by processing.
- Processed: the message has been executed successfully.
Through the buttons on the top panel we can perform the following actions:
- Process: allows us to manually execute messages that are in the “Queued” or “Error” state
- Edit before record: allows us to manually modify message parameters to be able to process it successfully. If we click, it opens the standard window of the particular process.
- Cancel: allows us to cancel messages that are in the “Error” state
- Queue: allows us to re-queue messages with the “Error” status
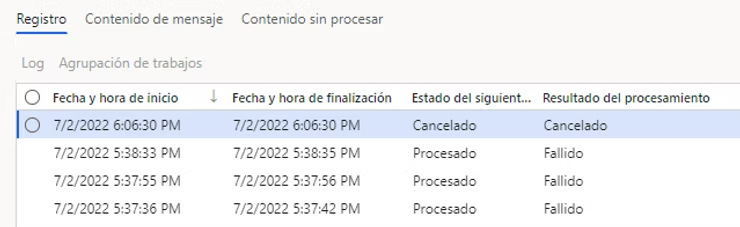
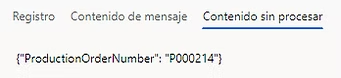
In the lower grid, we can see the content of the message as well as a history of its processing and consult the error log.
The following images are related to a process of completing a production order:

As a final touch to the theoretical part of the process, it is important to note that processing is independent for each production order; that is, each production order takes its own processing thread and is not affected by errors from other messages. However, if a production order has an erroneous message, message processing for that order is retained until the problem is resolved.
This is why it is interesting to configure alerts or warnings so that the plant manager knows if an error has occurred at some point that hinders message processing.
Technical Vision
Now let’s look more deeply at the technical part of this functionality.
First of all, we will define what the URL of the API is that must be attacked with the messages:
{EnvironmentURL}/api/services/SysMessageServices/SysMessageService/SendMessage
The general structure of messages in common to all is defined in the message body:
{
    "_companyId": "dataAreaId",
    "_messageQueue": "JmgMES3P",
    "_messageType": "ProdProductionOrderStart",
    "_messageContent": ""
}
Where:
- _companyId = dataAreaId of the company destination of the message within D365FO
- _messageQueue = corresponds to an enumerated that distinguishes the different message queues of D365FO. In this particular functionality, this property is fixed with the value “JmgMES3P”.
- _messageType = corresponds to the enumeration on the type of message within this queue. It can take the following values depending on the process to be performed:
- ProdProductionOrderStart
- ProdProductionOrderEnd
- ProdProductionOrderReportFinished
- ProdProductionOrderRouteCard
- ProdProductionOrderPickingList
- _messageContent = corresponds to the content of the message itself and depends on the operation to be performed.
Below I leave you an example for each type of operation:
| Process | Example Body |
|---|---|
| ProdProductionOrderStart | { “_companyId”: “USMF”, “_messageQueue”: “JmgMES3P”, “_messageType”: “ProdProductionOrderStart”, “_messageContent”: ”{\“ProductionOrderNumber\”: \“P000211\”}” } |
| ProdProductionOrderEnd | { “_companyId”: “USMF”, “_messageQueue”: “JmgMES3P”, “_messageType”: “ProdProductionOrderEnd”, “_messageContent”: ”{\“ProductionOrderNumber\”: \“P000214\”}” } |
| ProdProductionOrderReportFinished | { “_companyId”: “USMF”, “_messageQueue”: “JmgMES3P”, “_messageType”: “ProdProductionOrderReportFinished”, “_messageContent”: ”{\“ProductionOrderNumber\”: \“P000214\”, \“ReportFinishedLines\”: [{\“ItemNumber\”: \“L0100\”, \“ReportedGoodQuantity\”: 1, \“ReportAsFinishedDate\”: \“2021-01-01\”}]}” } |