Extending IoT Capabilities in Dynamics 365
Objective
The main objective of this article is to perform step-by-step the extension of the functionality that D365FO offers for IoT and to be able to add a new scenario entirely created by us. For this, it will be necessary to make modifications at both D365FO and Azure levels.
As is known, D365FO provides us with 5 available scenarios to handle IoT devices; the intention of this article is to learn how to add a new scenario through programming.
Basic Principles
The new scenario we are going to implement responds to the need for those devices subject to constant changes in their properties and that these changes must be within certain margins to avoid their deterioration.
A clear and well-known example by most is diving. When someone dives to great depths, they cannot return to the surface suddenly, but decompression must be gradual to avoid brain damage.
Another example at a more industrial level are the temperature differences that certain materials must undergo to “transform” into others (glass tempering, or steel creation).
So, we are going to implement a scenario that measures these differences between consecutive measurements and compares them with reference values to determine if it is within the range accepted by the product.
Increase = (Current Value - Previous Value) / (Time Increase)
Scenario to Create
Following the principle mentioned above, we are going to create a scenario that allows evaluating whether the differences in connected sensors are within the parameterized threshold for that measurement. In other words, the variation of its measurement per unit of time.
We will use the product quality scenario as a base since the one we intend to create is very similar.
Elements to Modify in D365FO
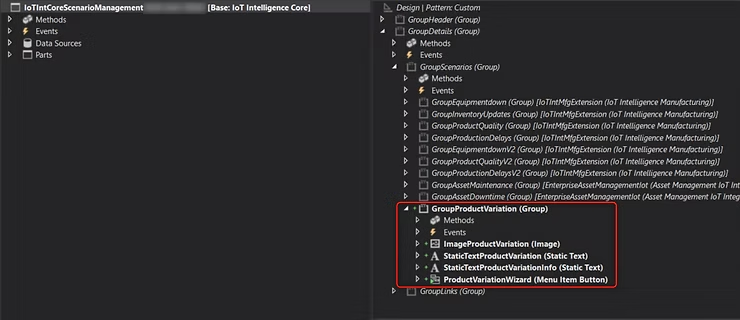
Form IoTIntCoreScenarioManagement
This is the main form where sensors are configured. This modification is intended to add a new button to configure the new scenario.
It is necessary to add a new group to configure the new scenario:
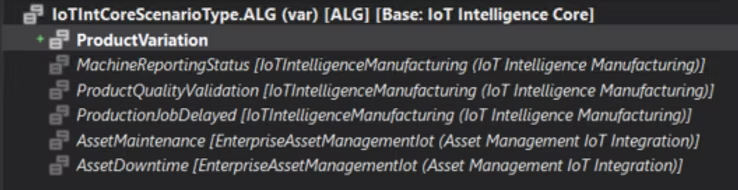
BaseEnum IoTIntCoreScenarioType
We will also add a new enumeration value to identify our new scenario.
Form Notifications IoTIntCoreNotification
We will extend the INIT of the Datasource to add our scenario to the notifications filter:
[ExtensionOf(formDataSourceStr(IoTIntCoreNotification, IoTIntCoreNotification))]
public final class IoTIntCoreNotification_IoTIntelligenceManufacturing_Variation_Extension
{
    public void init()
    {
        next init();

        var form = this.formRun();
        if (form && form.args() &&
            form.args().menuItemName() == menuItemDisplayStr(IoTIntCoreNotification))
        {
            var range = this.queryBuildDataSource().addRange(fieldNum(IoTIntCoreNotification, Type));
            range.value(strFmt('((%1.%2 == "%3") || (%1.%2 == "%4") || (%1.%2 == "%5") || (%1.%2 == "%6"))',
                tableStr(IoTIntCoreNotification),
                fieldStr(IoTIntCoreNotification, Type),
                SysQuery::value(enum2Symbol(enumNum(IoTIntCoreScenarioType), enum2int(IoTIntCoreScenarioType::ProductQualityValidation))),
                SysQuery::value(enum2Symbol(enumNum(IoTIntCoreScenarioType), enum2int(IoTIntCoreScenarioType::MachineReportingStatus))),
                SysQuery::value(enum2Symbol(enumNum(IoTIntCoreScenarioType), enum2int(IoTIntCoreScenarioType::ProductVariation))),
                SysQuery::value(enum2Symbol(enumNum(IoTIntCoreScenarioType), enum2int(IoTIntCoreScenarioType::ProductionJobDelayed)))));
        }
    }
}
Class IoTIntMfgNotificationProductVariationDeviationTemplate
Regarding D365FO, what we want is for the new scenario to be exactly the same as the Product Quality one. The substantial change will be carried out in Azure. So let’s make a copy of the IoTIntMfgNotificationQualityAttributeDeviationTemplate class and change its references to point to our scenario as well as the labels. This class is responsible for scenario configuration and notifications that will be shown if parameterized ranges are not met.
/// <summary>
/// The <c>IoTIntMfgNotificationProductVariationDeviationTemplate</c> class contains notification template
/// for quality attribute deviation notification.
/// </summary>
[IoTIntCoreNotificationType('ProductVariation')]
public class IoTIntMfgNotificationProductVariationDeviationTemplate extends IoTIntCoreNotificationTemplate
{
    .
    .
    .

    /// <summary>
    /// Creates missing <c>IoTIntCoreSensorScenarioMapping</c> records for each <c>IoTIntCoreSensorBusinessRecordMapping</c> records mapped to a
    /// resource.
    /// </summary>
    public void createSensorScenarioMappings()
    {
        IoTIntCoreSensorBusinessRecordMapping sensorBusinessRecordMappingResource;
        IoTIntCoreSensorBusinessRecordMapping sensorBusinessRecordMappingBatchAttribute;
        IoTIntCoreSensorScenarioMapping sensorScenarioMappingInsert;
        IoTIntCoreSensorScenarioMapping sensorScenarioMappingNotExist;

        const IoTIntCoreScenarioType ScenarioType = IoTIntCoreScenarioType::ProductQualityValidation;
        const IoTIntCoreSensorScenarioMappingActiveNoYesId NotActive = NoYes::No;

        insert_recordset sensorScenarioMappingInsert(SensorId, Scenario, Active)
            select SensorId, ScenarioType, NotActive from sensorBusinessRecordMappingResource
                where sensorBusinessRecordMappingResource.RefTableId == tableNum(wrkCtrTable)
            exists join sensorBusinessRecordMappingBatchAttribute
                where sensorBusinessRecordMappingBatchAttribute.RefTableId == tableNum(PdsBatchAttrib)
                    && sensorBusinessRecordMappingBatchAttribute.SensorId == sensorBusinessRecordMappingResource.SensorId
            notexists join sensorScenarioMappingNotExist
                where sensorScenarioMappingNotExist.SensorId == sensorBusinessRecordMappingResource.SensorId
                    && sensorScenarioMappingNotExist.Scenario == ScenarioType;
    }

    public boolean validateScenarioActivation(IoTIntCoreSensorId _sensorId)
    {
        IoTIntCoreSensorBusinessRecordMapping sensorBusinessRecordMappingResource;
        IoTIntCoreSensorBusinessRecordMapping sensorBusinessRecordMappingBatchAttribute;

        select firstonly RecId from sensorBusinessRecordMappingResource
            where sensorBusinessRecordMappingResource.SensorId == _sensorId
                && sensorBusinessRecordMappingResource.RefTableId == tableNum(wrkCtrTable)
            exists join sensorBusinessRecordMappingBatchAttribute
                where sensorBusinessRecordMappingBatchAttribute.RefTableId == tableNum(PdsBatchAttrib)
                    && sensorBusinessRecordMappingBatchAttribute.SensorId == sensorBusinessRecordMappingResource.SensorId;

        if (!sensorBusinessRecordMappingResource.RecId)
        {
            return checkFailed(strFmt("@IoTIntelligenceCore:ErrorMessage_SensorScenarioMappingActivationValidationFailed",
                enum2Str(IoTIntCoreScenarioType::ProductVariation),
                _sensorId,
                strFmt('%1,%2', tableId2PName(tableNum(WrkCtrTable)), tableId2PName(tableNum(PdsBatchAttrib)))));
        }

        return true;
    }

    public boolean validateDeleteSensorBusinessRecordMappingWithActiveScenario(IoTIntCoreSensorBusinessRecordMapping _sensorBusinessRecordMapping)
    {
        if (_sensorBusinessRecordMapping.RefTableId == tableNum(WrkCtrTable)
           || _sensorBusinessRecordMapping.RefTableId == tableNum(PdsBatchAttrib))
        {
            return checkFailed(strFmt("@IoTIntelligenceCore:ErrorMessage_SensorBusinessRecordMappingDeletionValidationFailed",
                _sensorBusinessRecordMapping.SensorId,
                tableId2PName(_sensorBusinessRecordMapping.RefTableId),
                enum2Str(IoTIntCoreScenarioType::ProductVariation)));
        }

        return true;
    }

    .
    .
    .

}
Elements to Modify in Azure
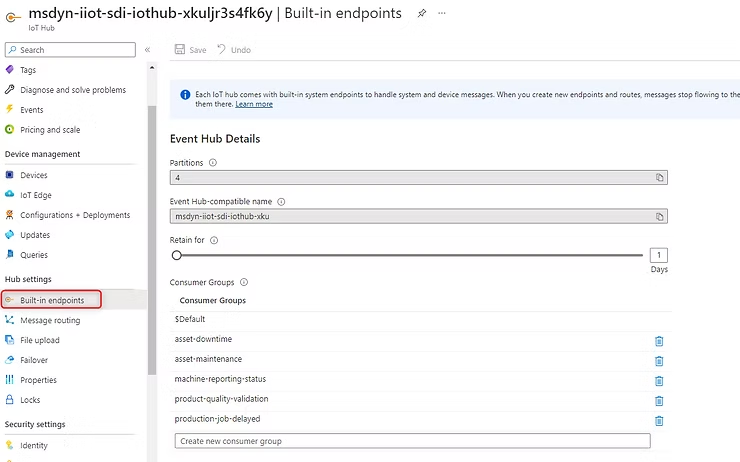
New Consumer Group in IoTHub
We create a new group to centralize IoT signals. This creation is mandatory since when we create an Azure Stream Analytics, it must point to a different consumer group.
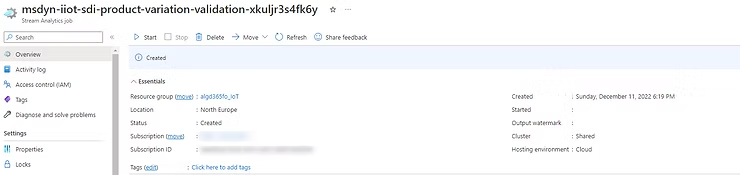
New Stream Analytics Resource
We create a new Stream Analytics resource:
We go to the INPUT tab and create a new element of type IoT Hub with the following characteristics (special attention to the group we created in the previous step):
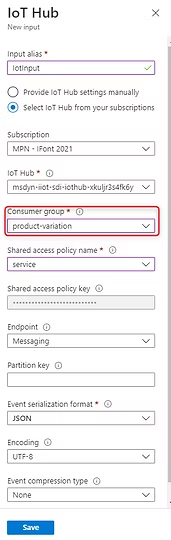
This input is what comes from our sensor and will capture the values that then need to be compared.
We also need to add another REFERENCE type BLOB with the following characteristics:
This input will collect the values stored in Blob Storage about tolerances and allow the resource to make the comparisons.
In the OUTPUTS tab we create an output of type Azure Functions with the following characteristics:
And a Service Bus Queue to manage notifications if necessary to display them:
In the QUERY tab we have to modify the statements within it. This is the most complex part and where you need to pay close attention:
//Creation of IoT INPUT
CREATE TABLE IotInput(
  eventEnqueuedUtcTime datetime,
  sensorId nvarchar(max),
  value float
);

//Creation of tolerances table
CREATE TABLE SensorJobItemBatchAttributeVariationReferenceInput(
  sensorId nvarchar(max),
  jobId nvarchar(max),
  orderId nvarchar(max),
  itemNumber nvarchar(max),
  attributeName nvarchar(max),
  jobDataAreaId nvarchar(max),
  jobRegistrationStartDateTime datetime,
  jobRegistrationStopDateTime datetime,
  isJobCompleted nvarchar(max),
  maximumAttributeTolerance float,
  minimumAttributeTolerance float,
  optimalAttributeValue float
);

//Evaluation of values
WITH SensorJobItemBatchAttributeValues AS
(
  SELECT
    I.sensorId,
    I.eventEnqueuedUtcTime,
    I.value,
    R.jobId,
    R.orderId,
    R.itemNumber,
    R.attributeName,
    R.jobDataAreaId,
    R.jobRegistrationStartDateTime,
    R.jobRegistrationStopDateTime,
    R.isJobCompleted,
    R.maximumAttributeTolerance,
    R.minimumAttributeTolerance,
    R.optimalAttributeValue,
    CASE
      WHEN I.value >= R.minimumAttributeTolerance AND I.value <= R.maximumAttributeTolerance THEN 1
      ELSE 0
    END AS attributeValueInRange
  FROM IotInput I
  TIMESTAMP BY I.eventEnqueuedUtcTime
  JOIN SensorJobItemBatchAttributeVariationReferenceInput R
  ON I.sensorId = R.sensorId
  -- Only consider jobs which are in progress and signals which came after the start of the job.
  WHERE DATEDIFF(year, R.jobRegistrationStopDateTime, CAST('1900-01-01' as datetime)) = 0
  AND I.eventEnqueuedUtcTime >= R.jobRegistrationStartDateTime
),
SensorJobItemBatchAttributeValuesState AS
(
  SELECT
  *,
   /** Determine value for last signal was in range or not having same partition values as current signal.
       previousSignalValueInRange will be null if there was no previous signal */
  LAG(attributeValueInRange) OVER
    (PARTITION BY
      sensorId,
      jobId,
      orderId,
      itemNumber,
      attributeName,
      jobDataAreaId
      LIMIT DURATION(minute, 15)
    ) AS previousSignalValueInRange,
    LAG(value) OVER
    (PARTITION BY
      sensorId,
      jobId,
      orderId,
      itemNumber,
      attributeName,
      jobDataAreaId
      LIMIT DURATION(minute, 15)
    ) AS previousValue,
    CASE
      WHEN value-LAG(value) OVER
    (PARTITION BY
      sensorId,
      jobId,
      orderId,
      itemNumber,
      attributeName,
      jobDataAreaId
      LIMIT DURATION(minute, 15)
    ) >= minimumAttributeTolerance AND value-LAG(value) OVER
    (PARTITION BY
      sensorId,
      jobId,
      orderId,
      itemNumber,
      attributeName,
      jobDataAreaId
      LIMIT DURATION(minute, 15)
    ) <= maximumAttributeTolerance THEN 1
      ELSE 0
    END AS attributeValueInRange
    FROM SensorJobItemBatchAttributeValues
)

SELECT
  CONCAT('ProductVariation:', jobId, ':', attributeName) AS metricKey,
  DATEDIFF(millisecond, CAST('1970-01-01' as datetime), eventEnqueuedUtcTime) AS uts,
  value AS val
INTO MetricOutput
from SensorJobItemBatchAttributeValues

SELECT
  jobDataAreaId AS dataAreaId,
  sensorId AS machineId,
  jobId AS jobId,
  orderId AS orderId,
  itemNumber AS itemId,
  minimumAttributeTolerance AS minValue,
  maximumAttributeTolerance AS maxValue,
  optimalAttributeValue AS targetValue,
  attributeName AS batchAttribId,
  sensorId AS sensorId,
  value AS sensorReading,
  eventEnqueuedUtcTime AS timestamp,
  eventEnqueuedUtcTime AS sensorTimestamp,
  System.Timestamp AS processingTimestamp,
  CASE
    WHEN attributeValueInRange = 1 THEN 'TRUE'
    ELSE 'FALSE'
  END AS validAttributeSignal,
  'ProductVariation' AS notificationType,
  CONCAT('ProductVariation:', jobId, ':', attributeName) AS publishedMetric,
  'Product Variation' AS publishedMetricDisplayName
INTO NotificationOutput
FROM SensorJobItemBatchAttributeValuesState
-- This ensures that we are not sending the notification twice.
WHERE
(
  (
    attributeValueInRange = 0 AND
    (previousSignalValueInRange IS NULL OR previousSignalValueInRange = 1)
  )
  OR
  (
    attributeValueInRange = 1 AND
    previousSignalValueInRange = 0
  )
)
And finally and most importantly, you have to modify the Logic App and add an entire new branch that manages the new scenario. Since it’s very complex to explain each step here, I leave you a link to GitHub where the template with the added branch is uploaded. Remember that we are making a modified copy of the current product quality one.
https://github.com/iD365FOnt/D365FO_IoT_LogicApp
Once we’ve reached this point we can test our scenario and verify how the system alerts us when the signals exceed the parameterized tolerances.
To perform the tests, an IoT Emulator was created specifically to be able to play with the values and have a more user-friendly interface. I share with you the GitHub URL with the application:
https://github.com/iD365FOnt/IoTEmulator
I hope you enjoyed this article. In the next post we will see the tool in action and the different options it offers at the user level.
HAPPY HOLIDAYS!